
Plan review · Workshop
Simple 2×4 Workbench
A plan by Jen Woodhouse · reviewed by ThePlanStack, July 2026
A sound, simple bench — but the frame rails, not the plywood, are what limit it: keep heavy loads over the legs and treat ~490 lb spread as the working number.
- Cost$150-$200
- SkillBeginner
- TimeAn afternoon
- Holds~490 lb
The honest take
What the plan doesn't tell you
• The two long rails in the top frame are the hardest-working parts of this bench, and the plan gives them a 47-inch clear run between the legs with nothing under the middle. Spread the full 750 lb this size of top invites across them and a rail is at 47% of its allowable bending stress — a safety factor near 2.1 rather than the 3-plus we want before calling a bench stout. It will not break under normal shop use. But park the heavy things over the legs, not mid-span, and if you want to store an engine block on it, add a second pair of legs at the centre or sister a second 2×4 onto each long rail.
• The plan never says whether the legs go inside or outside the frames, and it changes the finished bench. Hang them on the outside, flush with the frame ends. That is the only arrangement that gives you the 3-inch top overhang the plan claims on all four sides — inside the frames you get 3 inches at the ends and 4-1/2 inches front and back.
• The 1-1/4 inch screws specified for the top pass through 3/4-inch plywood and leave half an inch of thread in the 2×4 frame. That is the weakest connection on the bench. Use 2-inch screws instead, countersunk below the surface so nothing catches your work.
• There is no glue anywhere in the materials list. Every joint here is a butt joint carrying its load through fasteners alone. Glue the frame joints and the leg faces as you go, or the bench will loosen and start to rack after a couple of years of real use.
• You need two full sheets of plywood for about 25 square feet of parts. The 60 x 36 top and the 54 x 27 shelf cannot both come out of one sheet, and most of the second sheet is left over. Budget for it, or have the store rip you a half sheet.
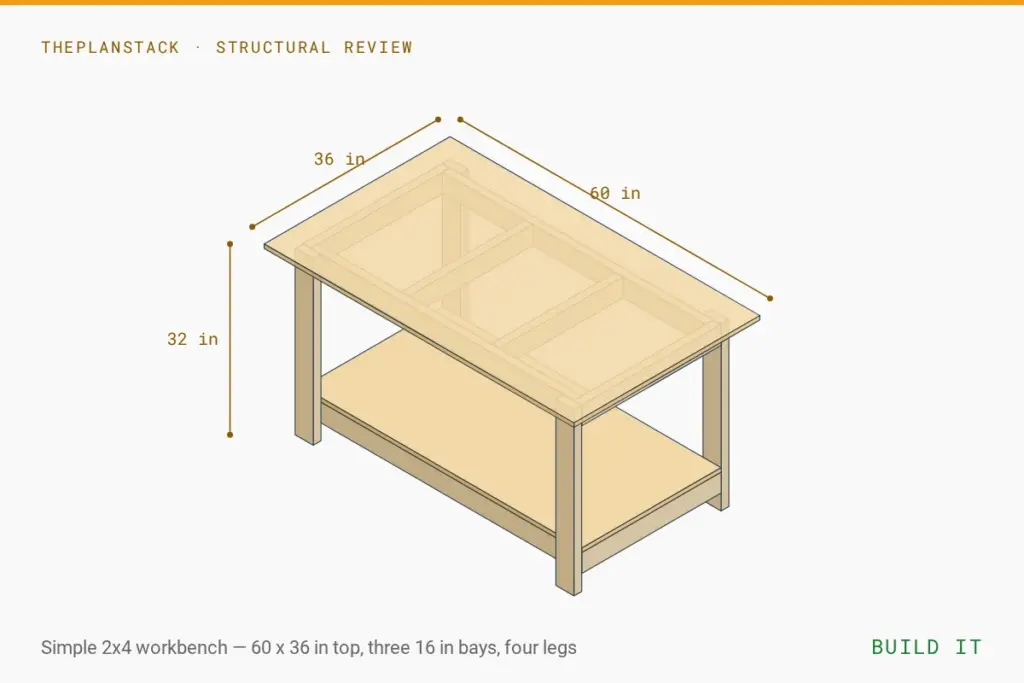
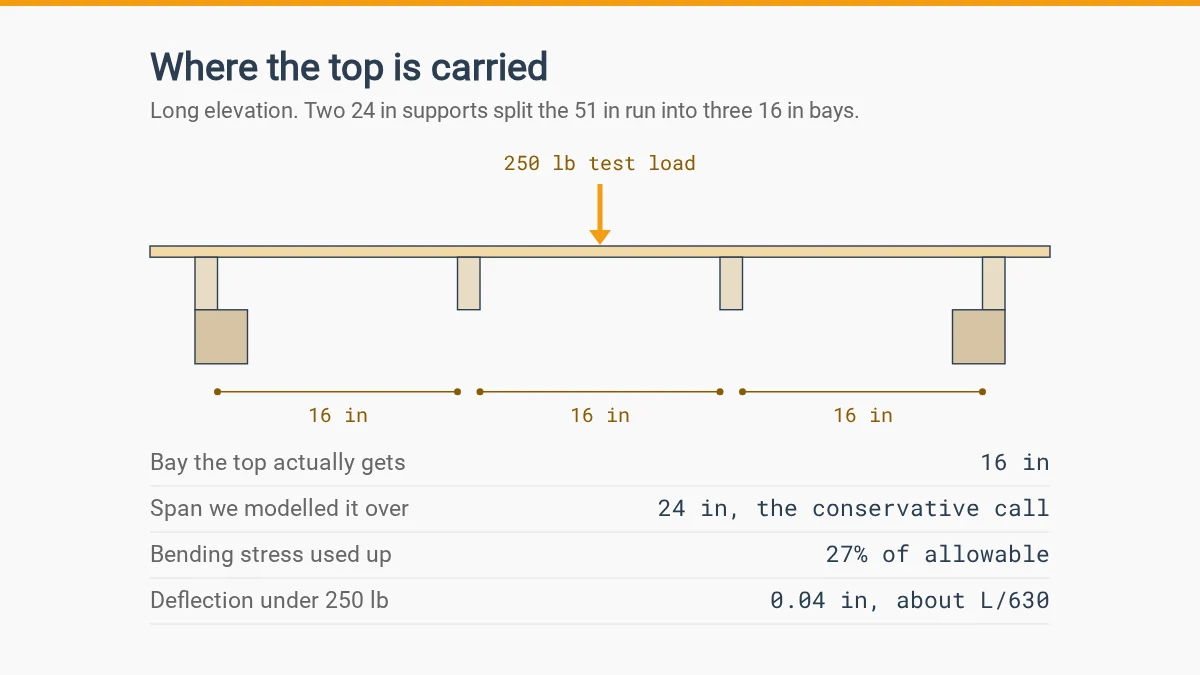
This is about as simple as a workbench gets, and that is the point. Two identical 2x4 frames, four legs, two sheets of plywood, and nothing beyond butt joints and screws. The plywood is well looked after — two cross supports split the run into three 16-inch bays, so the top never has far to span, and it comes back stiff rather than springy. The part the plan does not look after is what those cross supports hand their load to: the two long rails of the top frame, running 47 inches between the legs with nothing underneath them. That is where this bench runs out of margin first, and it is a cheap thing to fix if you want the extra. What the plan also leaves out is how the legs meet the frames and what actually holds the top down. Settle those and this will outlast the shop it stands in.
Who it's for
Who should build this — and who should skip it
A genuine first build. If you can cut a straight line with a circular saw and drive a screw, this is an afternoon's work. It is an assembly table and a general work surface — the 3-inch plywood overhang gives you something to clamp against, but there is no vise, no dog holes and no apron. Skip it if you want a bench to plane or pound on: at 32 inches with a screwed-down plywood top, it is not that bench, and extra screws will not make it one. If you mean to load it heavily, build it with the extra centre legs described below.
The checks
What we checked, and what held
Holds ~490 lb safely
Finished size 32H x 60W x 36D
Carries normal workshop use, but the frame rails are the limit - keep heavy loads over the legs.
- Governing member
- Top-frame long rail, between the legs
- Material
- SPF 2x4 on edge
- Cross section
- 1.50 in × 3.50 in
- Orientation
- On edge
- Clear span
- 47.0 in
- Load applied
- 392 lb
- Measured sag
- 0.0651 in
- Working load
- ~490 lb
- Finished weight
- 113.2 lb
Load case half the worktop's 750 lb design load, delivered along the rail - the load case that governs
| Check | Result |
|---|---|
| Bending in the top-frame long rail, between the legs — 47% of allowable | PASS |
| Sag in the same member — L/722 against an L/360 limit | PASS |
| Plywood top (27% bending) | PASS |
| Bottom shelf (22% bending) | PASS |
| Legs in compression (6%) | PASS |
| Screwed frame joints (26% worst) | PASS |
| Tip-over resistance, unloaded — ratio 3.26 against a 1.0 target | PASS |
The structural reality. The plywood top is not the limiting part of this bench — the frame under it is. Checked over a 24-inch span with 250 lbs parked in the middle of one bay, the top uses 27% of the plywood’s allowable bending stress. The two long rails of the top frame are the parts doing the real work: each one carries about 392 lbs — half the 750 lb this size of worktop invites — across a 47-inch clear run between the legs, with nothing under the middle. That works the 2×4 to 47% of its allowable bending stress and sags it 0.065 inches, about 1/722th of the span.
What that means for the rating. A safety factor of 2.12 on the governing member, 1.96 once confidence is folded in, is short of the 3-plus we want before calling a bench stout — so this one is rated for review rather than waved through. Our working number is ~490 lbs spread across the top, which is what leaves a comfortable margin on the rails. The bench will carry more than that; it just stops having much in reserve. Nothing else on it is close to its limit: the shelf runs at 22%, the legs at 6% in compression, the hardest-worked screwed joint at 26%. At 113 lbs on a 30-inch base, tipping never enters the conversation.
The two things we would change. Put a second pair of legs under the centre of the long rails, or sister a second 2×4 onto each — either one moves the frame out of the way as the limit and costs a few dollars. And the 1-1/4 inch screws the plan uses for the top leave half an inch of thread in the frame once they clear the 3/4-inch plywood; use 2-inch screws. That is the one specified fastener on this bench we would not build with.
These are planning estimates, not a stamped engineering analysis. Wood varies board to board, and assembly quality matters as much as the arithmetic — for anything safety-critical, check with a qualified pro.
Furniture mode, analysis v7.0. Planning estimates — check anything safety-critical with a qualified pro. How we analyze plans.
Build tips
Before you build
- Set a stop block on your saw for the repeats. Sixteen of the eighteen pieces are cut in matched sets of four, and if the four legs are not identical the bench will rock no matter how flat your floor is.
- Build both frames on the flattest surface you own, not on sawhorses. The top frame's flatness becomes the bench's flatness, and a twist you build in now is one you will fight every time you clamp something down.
- If you are much over 5 foot 10, add to the legs before you cut. The finished top lands at 32 inches, which is fine for assembly and low for anything you lean into. Every inch you add to the 31-1/4 inch legs raises the top by the same inch and changes nothing else in the cut list.
Reference
Materials & cut list
Lumber & sheet goods
- 2x4x8′ SPF (qty: 7)
- 3/4 in plywood sheet 4×8 (qty: 2)
Hardware
- 2-1/2 in self-tapping wood screws (qty: ~60)
- 2 in wood screws for the top and shelf (qty: ~40) — the plan calls for 1-1/4 in; use 2 in
- Wood glue — not in the plan’s list, use it anyway
- 120/220 grit sandpaper
View Full Cut List & Materials
| Part Name | Qty | Dimensions | Material |
|---|---|---|---|
| Long stretchers | 4 | 51" x 3.5" x 1.5" | 2x4 SPF |
| Short stretchers | 4 | 27" x 3.5" x 1.5" | 2x4 SPF |
| Supports | 4 | 24" x 3.5" x 1.5" | 2x4 SPF |
| Legs | 4 | 31.25" x 3.5" x 1.5" | 2x4 SPF |
| Bottom shelf | 1 | 54" x 27" x 0.75" | 3/4 Plywood |
| Top | 1 | 60" x 36" x 0.75" | 3/4 Plywood |
Cut List Calculator
Cut List Calculator
Calculating optimal cuts...
| Part | Qty | Length | Width | Material |
|---|
Original plan
About this design
This design is Jen Woodhouse’s work, not ours. We review free DIY plans and add the engineering: load paths, spans, joints, and the fixes worth making before you cut. We do not republish the build instructions. For the steps, the photographs and the author’s own notes, go to the source.
Keep looking
Other plans to compare
We have reviewed these builds too: