
Plan review · Workshop
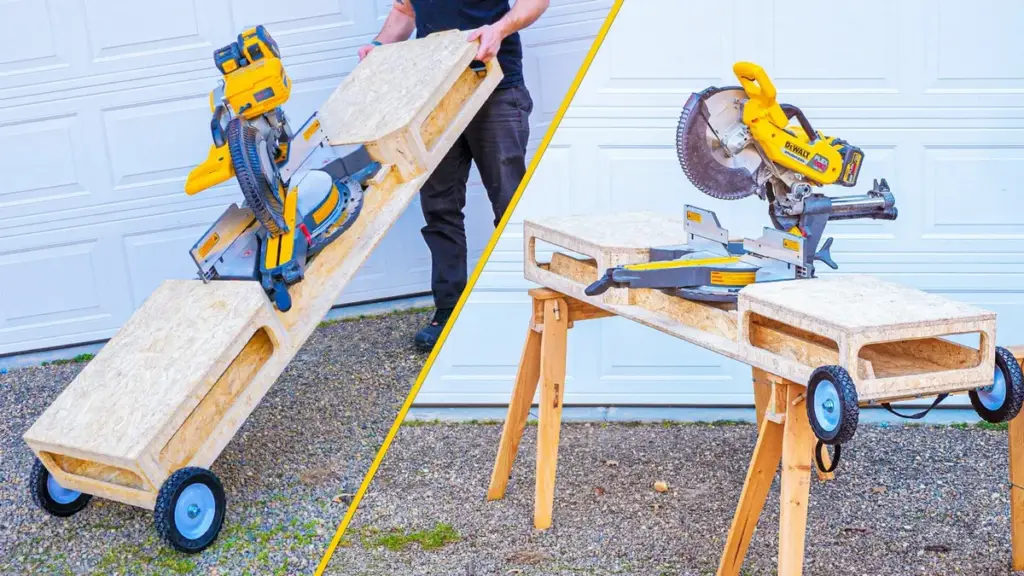
DIY Mobile Miter Saw Stand with Wheels
A plan by Johnny Brooke · reviewed by ThePlanStack, January 2026
Rolling saw stand, ~150 lb top — cheap and sturdy.
Sturdy for everyday use — holds ~150 lb with margin to spare.
- Cost$50-$100
- SkillIntermediate
- TimeAn afternoon
- Holds~150 lb
The honest take
What the plan doesn't tell you
• The 8-inch height is not a standard working height. This is either a low rolling cart or a top for an existing workbench. Verify it meets your needs before buying materials.
• A 76.5-inch span with only three structural parts is a recipe for sagging or racking. The stand could be unstable when loaded with a saw and long boards.
• Pocket screws into the edge grain of plywood can easily cause splitting or pull-out. Be sure your jig is set perfectly for 3/4″ material and don’t overtighten the screws.
• This will be heavy and awkward. Moving a nearly 7-foot-long plywood assembly can be difficult and may stress the minimal joinery.
• The complete lack of assembly instructions is a major red flag. You’ll have to figure out all part placement and joint layout on your own, which invites error.
This plan is concerningly simple. With only three pieces for a 76.5-inch wide stand, its stability is questionable, especially for a heavy miter saw. The 8-inch height is also very unusual; confirm this isn't a typo and that you don't need a full-height stand. Using pocket screws in 3/4" plywood is fine, but without assembly instructions showing placement and orientation, you risk weak joints. This feels more like a concept than a complete, reliable plan.
Who it's for
Who should build this — and who should skip it
A good step-up build — fine if you've made a few things and own a drill/driver and a way to cut straight. A shop fixture sized to carry a miter saw and workpieces. Skip it if you need it to carry much past ~150 lb.
The checks
What we checked, and what held
Holds ~150 lb safely
Finished size 8H x 76.5W x 18D
Comfortably handles normal household use with a sound safety margin.
- Governing member
- Bottom/top panel
- Material
- Plywood
- Cross section
- 18.00 in × 0.75 in
- Orientation
- Flat
- Clear span
- 30.0 in
- Load applied
- 90 lb
- Measured sag
- 0.0333 in
- Working load
- ~150 lb
- Finished weight
- 20.7 lb
Load case ~90 lbs on this member - its share of a ~150 lb load on the whole piece
| Check | Result |
|---|---|
| Bending in the bottom/top panel — 12% of allowable | PASS |
| Sag in the same member — L/900 against an L/120 limit | PASS |
| Front Stiffener Rail | PASS |
| Back Stiffener Rail | PASS |
Conservative run Checked a second time against stricter standards, the same member reads L/600 at 18% of allowable — PASS
The structural reality. We checked the part that works hardest here — the plywood bottom/top panel — as a loaded beam over its real working span. Under a realistic in-use load it barely flexes — well within furniture limits, deflecting only about 1/900 of its span, with bending stress at roughly 12% of what the wood allows. In short, it should feel firm and stay that way.
Solid for its purpose. Our conservative estimate puts the safe working load at ~150 lbs — enough for a mounted saw and the workpieces you feed across it. Real-world strength depends just as much on assembly: glue every joint, keep the frame square, and drive your fasteners fully home.
These are planning estimates, not a stamped engineering analysis. Wood varies board to board — for anything safety-critical, check with a qualified pro.
Furniture mode, analysis v7.0. Planning estimates — check anything safety-critical with a qualified pro. How we analyze plans.
Build tips
Before you build
- Before cutting, place your miter saw on a flat surface and measure the height of its deck. You'll need to build the stand's center section lower than the wings by this exact amount for material to sit flat.
- Use a quality wood glue on all joints in addition to the pocket screws. This will add significant rigidity, which this minimalist design desperately needs.
- I'd strongly consider adding a back panel or at least some corner braces, even if they aren't in the plan. This will help prevent the stand from racking side-to-side.
Reference
Materials & cut list
Lumber & sheet goods
- 3/4 in OSB sheet 4×8 (qty: 1)
Hardware
- 1-1/4 in pocket screws (qty: 100)
- 1-5/8 in trim head screws (qty: 50)
- Wood glue
- 8 in lawnmower wheels (qty: 2)
- 1/2 in threaded rod (All Thread) (qty: 1)
- 1/2 in hex nuts (qty: 4)
- 1/2 in locknuts (qty: 2)
- 1/2 in fender washers (qty: 4)
- 1/2 in EMT conduit straps (qty: 4)
- Brad nails
View Full Cut List & Materials
| Part Name | Qty | Dimensions | Material |
|---|---|---|---|
| Bottom Panel | 1 | 76.5" x 18" x 0.75" | 3/4 OSB |
| Stiffener Rails | 2 | 76.5" x 3.5" x 0.75" | 3/4 OSB |
Cut List Calculator
Cut List Calculator
Calculating optimal cuts...
| Part | Qty | Length | Width | Material |
|---|
Original plan
About this design
This design is Johnny Brooke’s work, not ours. We review free DIY plans and add the engineering: load paths, spans, joints, and the fixes worth making before you cut. We do not republish the build instructions. For the steps, the photographs and the author’s own notes, go to the source.
Keep looking
Other plans to compare
We have reviewed these builds too: