
Plan review · Workshop
Miter Saw Station
A plan by Hertoolbelt · reviewed by ThePlanStack, January 2026
Big advanced shop station, ~120 lb work surface — sturdy, plan on a full weekend+.
Sturdy for everyday use — holds ~120 lb with margin to spare.
- Cost$400-$600
- SkillAdvanced
- TimeA weekend+
- Holds~120 lb
The honest take
What the plan doesn't tell you
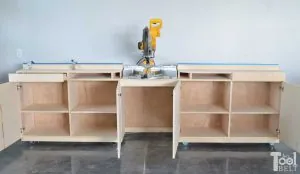
• This 122-inch unit will be incredibly heavy and awkward. Plan to build it in sections or assemble it in its final location, as moving the completed station will be nearly impossible.
• Maintaining a perfectly flat and level top across the entire 10-foot span is the main challenge. Use a long straightedge and check for square constantly, as small errors will compound.
• Breaking down full sheets of birch plywood requires care to avoid tear-out. Use a fine-tooth blade and consider scoring your cut lines or using painter’s tape along the cut.
• Without assembly guidance, you are responsible for planning the entire build. Dry fit all cabinet boxes and sections before driving any screws to ensure proper alignment and fit.
This is a substantial build that creates a lot of workspace. Using birch plywood and pocket screws is a standard, effective approach for shop cabinets like these. The plan's biggest weakness is the lack of assembly instructions, which is a major hurdle for an 'Advanced' project with 54 individual pieces. You'll have to figure out the build sequence on your own, paying close attention to keeping the 122-inch-long structure square and supported during assembly.
Who it's for
Who should build this — and who should skip it
For experienced builders — lots of parts and precise fits; not a first project. A shop fixture sized to carry a miter saw and workpieces. Skip it if you need it to carry much past ~120 lb.
The checks
What we checked, and what held
Holds ~120 lb safely
Finished size 35 5/8H x 122W x 15 3/4D
Comfortably handles normal household use with a sound safety margin.
- Governing member
- Work-top (between supports)
- Material
- Plywood
- Cross section
- 8.00 in × 0.75 in
- Orientation
- Flat
- Clear span
- 24.0 in
- Load applied
- 72 lb
- Measured sag
- 0.0307 in
- Working load
- ~120 lb
- Finished weight
- 197.6 lb
Load case ~72 lbs on this member - its share of a ~120 lb load on the whole piece
| Check | Result |
|---|---|
| Bending in the work-top (between supports) — 18% of allowable | PASS |
| Sag in the same member — L/781 against an L/120 limit | PASS |
| Right Cabinet Top | PASS |
| Left Cabinet Bottom | PASS |
| Right Cabinet Bottom | PASS |
| Left Cabinet Top Support | PASS |
Conservative run Checked a second time against stricter standards, the same member reads L/521 at 26% of allowable — PASS
The structural reality. We checked the part that works hardest here — the plywood work-top — as a loaded beam over its real working span. Under a realistic in-use load it barely flexes — well within furniture limits, deflecting only about 1/781 of its span, with bending stress at roughly 17% of what the wood allows. In short, it should feel firm and stay that way.
Solid for its purpose. Our conservative estimate puts the safe working load at ~120 lbs — enough for a mounted saw and the workpieces you feed across it. Real-world strength depends just as much on assembly: glue every joint, keep the frame square, and drive your fasteners fully home.
These are planning estimates, not a stamped engineering analysis. Wood varies board to board — for anything safety-critical, check with a qualified pro.
Furniture mode, analysis v7.0. Planning estimates — check anything safety-critical with a qualified pro. How we analyze plans.
Build tips
Before you build
- Label every single one of the 54 pieces with painter's tape as soon as you cut it. This is essential for tracking parts and planning your assembly without a guide.
- Start by building the base cabinet carcasses on a known flat surface. If your shop floor isn't level, use shims to get these base structures perfectly co-planar before joining them.
Reference
Materials & cut list
Lumber & sheet goods
- 3/4 in plywood sheet 4×8 (qty: 3)
- 1/4 in plywood sheet 4×8 (qty: 1)
Hardware
- 3 in casters (qty: 8)
- Frameless full overlay cabinet door hinges (qty: 8)
- 14 in drawer slides (qty: 2 pairs)
- Cabinet knobs (qty: 4)
- 1-1/4 in brad nails (qty: 150)
- Wood glue
- Sandpaper
- 1-1/4 in pocket hole screws (qty: 125)
- Kreg Precision Trak and Stop Kit (qty: 1)
- Shelf pins (qty: 16)
View Full Cut List & Materials
| Part Name | Qty | Dimensions | Material |
|---|---|---|---|
| Cabinet door | 4 | 27.375" x 23.875" x 0.75" | 3/4 Plywood |
| Drawer front | 2 | 23.875" x 3.5" x 0.75" | 3/4 Plywood |
| Fence | 2 | 48" x 3" x 0.75" | 3/4 Plywood |
| Back table | 2 | 48" x 7" x 0.75" | 3/4 Plywood |
| Front table | 2 | 48" x 8" x 0.75" | 3/4 Plywood |
| Cabinet top | 2 | 46.5" x 15.5" x 0.75" | 3/4 Plywood |
| Cabinet bottom | 2 | 46.5" x 15.5" x 0.75" | 3/4 Plywood |
| Cabinet side outside | 2 | 32.625" x 15.75" x 0.75" | 3/4 Plywood |
| Cabinet divider | 2 | 26.375" x 15.5" x 0.75" | 3/4 Plywood |
| Table support | 4 | 15.5" x 2.75" x 0.75" | 3/4 Plywood |
| Shelf support | 2 | 14.75" x 1.75" x 0.75" | 3/4 Plywood |
| Cabinet side inside | 2 | 32.625" x 15.75" x 0.75" | 3/4 Plywood |
| Miter saw shelf | 1 | 26" x 15.75" x 0.75" | 3/4 Plywood |
| Shelf | 4 | 22.625" x 15.5" x 0.75" | 3/4 Plywood |
| Drawer b/f | 4 | 14" x 1.5" x 0.75" | 3/4 Plywood |
| Drawer side | 4 | 20.375" x 1.5" x 0.75" | 3/4 Plywood |
| MS shelf front | 1 | 26" x 2.5" x 0.75" | 3/4 Plywood |
| Bottom brace | 1 | 26" x 2.5" x 0.75" | 3/4 Plywood |
| Cabinet top support | 2 | 46.5" x 2" x 0.75" | 3/4 Plywood |
| Bottom skirt | 4 | 46.5" x 2" x 0.75" | 3/4 Plywood |
| Cabinet back | 2 | 46.5" x 30.625" x 0.25" | 1/4 Plywood |
| Middle back | 1 | 29.125" x 26" x 0.25" | 1/4 Plywood |
| Drawer bottoms | 2 | 21.875" x 14" x 0.25" | 1/4 Plywood |
Cut List Calculator
Cut List Calculator
Calculating optimal cuts...
| Part | Qty | Length | Width | Material |
|---|
Original plan
About this design
This design is Hertoolbelt’s work, not ours. We review free DIY plans and add the engineering: load paths, spans, joints, and the fixes worth making before you cut. We do not republish the build instructions. For the steps, the photographs and the author’s own notes, go to the source.
Keep looking
Other plans to compare
We have reviewed these builds too: