
Plan review · Workshop
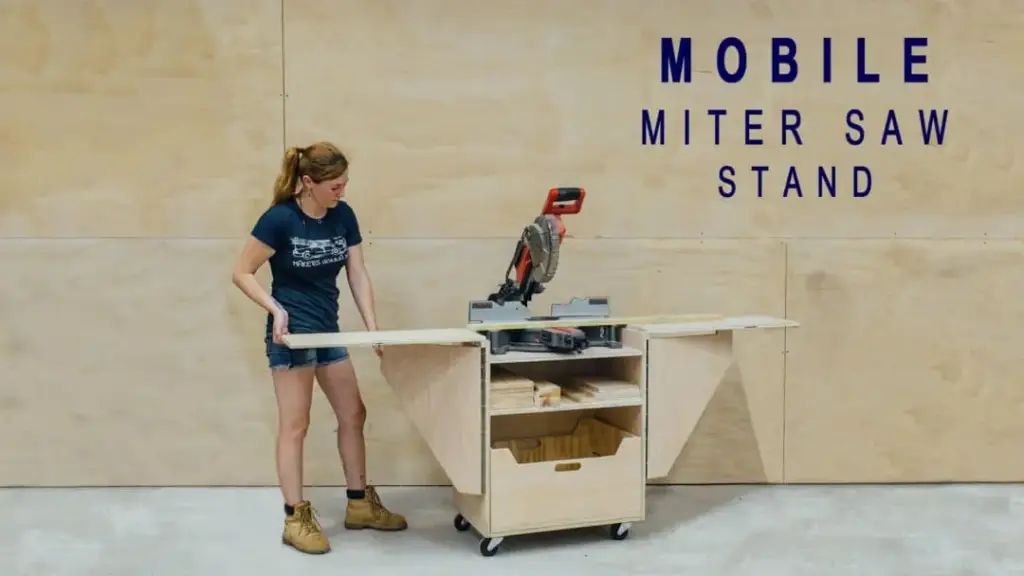
DIY Mobile Miter Saw Stand
A plan by April Wilkerson · reviewed by ThePlanStack, January 2026
Solid mobile saw stand — happily holds a saw + workpieces (~150 lb).
Sturdy for everyday use — holds ~150 lb with margin to spare.
- Cost$150-$200
- SkillIntermediate
- TimeA weekend
- Holds~150 lb
The honest take
What the plan doesn't tell you
• At 36 inches tall, this stand can become top-heavy once the saw is mounted. Ensure your casters are high-quality and lock securely.
• Cutting hardware with a reciprocating saw or hacksaw requires precision. Wear safety glasses and secure the part in a vise to prevent it from slipping.
• Pocket holes in plywood can cause tear-out. Use a sharp drill bit and a backing board if you’re having trouble getting clean holes.
• The final assembly will be heavy. Build it near its final location or get help moving it before you mount the saw.
This is a solid plan for a miter saw stand. Using pocket screws and glue with birch plywood is a reliable method for a workshop project that needs to be both sturdy and mobile. The plan's strength is its detail; having specific orientation guidance in all 11 steps and support notes in five of them is exactly what you need to prevent a wobbly final product. Don't underestimate the importance of those details for keeping the carcass square and strong enough to handle the saw's weight.
Who it's for
Who should build this — and who should skip it
A good step-up build — fine if you've made a few things and own a drill/driver and a way to cut straight. A shop fixture sized to carry a miter saw and workpieces. Skip it if you need it to carry much past ~150 lb.
The checks
What we checked, and what held
Holds ~150 lb safely
Finished size 36H x 30W x 24D
Comfortably handles normal household use with a sound safety margin.
- Governing member
- Work-top panel
- Material
- Plywood
- Cross section
- 23.00 in × 0.75 in
- Orientation
- Flat
- Clear span
- 24.0 in
- Load applied
- 90 lb
- Measured sag
- 0.0134 in
- Working load
- ~150 lb
- Finished weight
- 80.6 lb
Load case ~90 lbs on this member - its share of a ~150 lb load on the whole piece
| Check | Result |
|---|---|
| Bending in the work-top panel — 8% of allowable | PASS |
| Sag in the same member — L/1797 against an L/120 limit | PASS |
| Right Sides | PASS |
| Bottom | PASS |
| Top Shelf | PASS |
| Middle Shelf | PASS |
| Tip-over resistance, unloaded — ratio 1.29 against a 1.0 target | PASS |
Conservative run Checked a second time against stricter standards, the same member reads L/1198 at 11% of allowable — PASS
The structural reality. We checked the part that works hardest here — the plywood work-top panel — as a loaded beam over its real working span. Under a realistic in-use load it barely flexes — well within furniture limits, deflecting only about 1/1797 of its span, with bending stress at roughly 8% of what the wood allows. In short, it should feel firm and stay that way.
Solid for its purpose. Our conservative estimate puts the safe working load at ~150 lbs — enough for a mounted saw and the workpieces you feed across it. Real-world strength depends just as much on assembly: glue every joint, keep the frame square, and drive your fasteners fully home.
These are planning estimates, not a stamped engineering analysis. Wood varies board to board — for anything safety-critical, check with a qualified pro.
Furniture mode, analysis v7.0. Planning estimates — check anything safety-critical with a qualified pro. How we analyze plans.
Build tips
Before you build
- When joining the large plywood panels, use corner clamps to hold pieces at a perfect 90-degree angle while you drive the pocket screws. This is critical for a square frame.
- Before attaching the top, check the entire base assembly for square by measuring diagonally from corner to corner. The two measurements should be identical.
- Apply wood glue to every joint before screwing. It'll add significant long-term rigidity, which is important for a cart that gets rolled around the shop.
Reference
Materials & cut list
Lumber & sheet goods
- 3/4 in Red Oak Veneer Plywood 4×8 sheet (qty: 1)
- 3/4 in Construction Grade Plywood 4×8 sheet (qty: 1)
Hardware
- 1-1/4 in pocket screws (qty: 100)
- Wood glue
- Piano hinges
- 3 in casters (qty: 4)
- 18 gauge brad nails
- General Finishes High Performance Clear Coat
View Full Cut List & Materials
| Part Name | Qty | Dimensions | Material |
|---|---|---|---|
| Sides | 2 | 34" x 24" x 0.75" | 3/4 Plywood |
| Bottom | 1 | 24" x 23" x 0.75" | 3/4 Plywood |
| Top Shelf | 1 | 24" x 23" x 0.75" | 3/4 Plywood |
| Middle Shelf | 1 | 24" x 23" x 0.75" | 3/4 Plywood |
| Wings | 2 | 24" x 16" x 0.75" | 3/4 Plywood |
| Wing Supports | 2 | 16" x 12" x 0.75" | 3/4 Plywood |
| Wing Hinge Mount | 2 | 24" x 3" x 0.75" | 3/4 Plywood |
| Bin Front/Back | 2 | 22.25" x 10" x 0.75" | 3/4 Plywood |
| Bin Sides | 2 | 22.5" x 10" x 0.75" | 3/4 Plywood |
| Bin Bottom | 1 | 22.25" x 21" x 0.75" | 3/4 Plywood |
| Wing Stop | 2 | 3" x 1.5" x 0.75" | 1x2 |
Cut List Calculator
Cut List Calculator
Calculating optimal cuts...
| Part | Qty | Length | Width | Material |
|---|
Original plan
About this design
This design is April Wilkerson’s work, not ours. We review free DIY plans and add the engineering: load paths, spans, joints, and the fixes worth making before you cut. We do not republish the build instructions. For the steps, the photographs and the author’s own notes, go to the source.
Keep looking
Other plans to compare
We have reviewed these builds too: