
Plan review · Seating
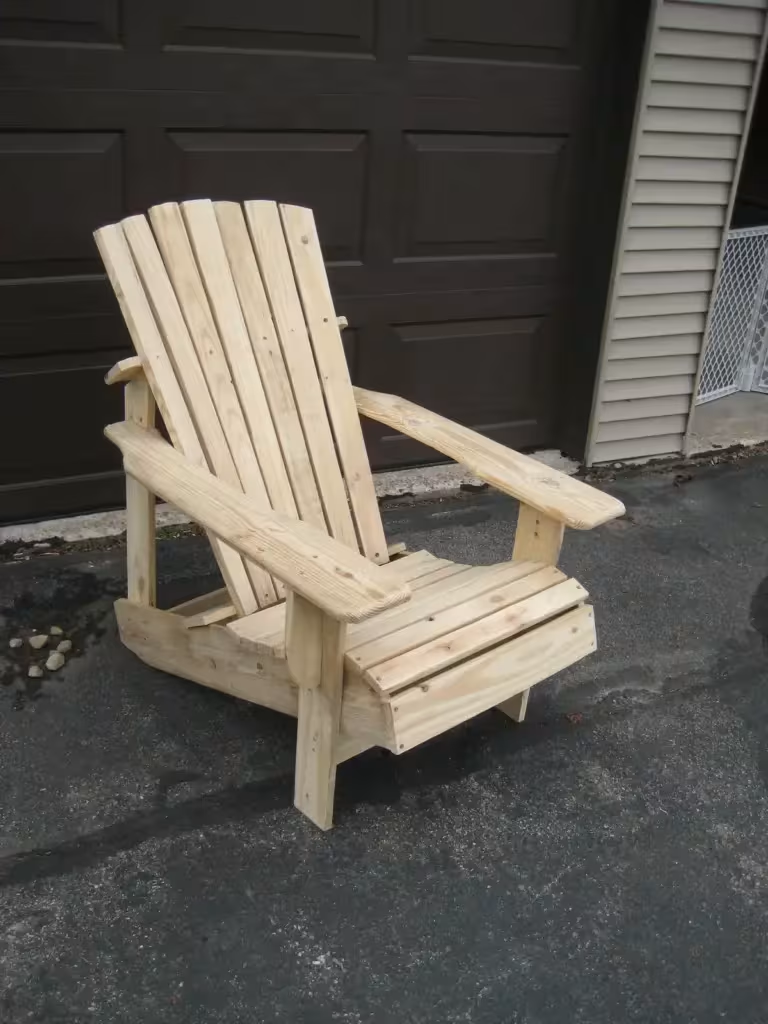
Pallet Adirondack Chair
A plan by jkratman · reviewed by ThePlanStack, January 2026
Cheap pallet-wood chair (~250 lb) that tips easily — add ballast or anchor it.
Solid for normal use — holds ~250 lb; just don't overload it — and it tips easily, so read the tip-over note below.
- Cost$0-$25
- SkillIntermediate
- TimeA weekend
- Holds~250 lb
The honest take
What the plan doesn't tell you
• Pallet wood is unpredictable. Check for ‘HT’ (heat-treated) stamps and avoid any with ‘MB’ (methyl bromide). Always wear gloves and a mask when sanding, and scan for hidden nails that will destroy saw blades.
• The angled cuts for the back slats and rear legs are critical. A circular saw can drift on these; clamp a straightedge guide to ensure accuracy or you’ll have trouble with assembly.
• This chair’s strength depends entirely on screw placement. Pre-drill every hole to prevent the thin pallet slats from splitting, especially where the legs attach to the seat frame.
• The curved armrests and back support require a jigsaw. Make a cardboard template first to ensure both sides are symmetrical before you cut your wood.
This plan relies on screws and glue, which can be adequate for an outdoor chair if you use exterior-grade glue and long-enough screws. The extensive orientation guidance in 12 of the steps is crucial for getting the complex Adirondack angles right. My main concern is the material; "pallet wood" is inconsistent, so inspect every board for cracks, rot, or stamps like 'MB' indicating chemical treatment. If you opt for the recommended cedar instead, you'll have a much more durable and predictable build. Pay close attention to the bracing steps, as they provide most of the chair's rigidity.
Who it's for
Who should build this — and who should skip it
A good step-up build — fine if you've made a few things and own a drill/driver and a way to cut straight. Outdoor lounge seating for an adult (or two). Skip it if you need it to carry much past ~250 lb — and treat it as a piece to anchor to the wall, not a free-standing one.
The checks
What we checked, and what held
Holds ~250 lb safely
Finished size 36H x 22W x 35D
Suitable for light household use; avoid concentrated overloading.
- Governing member
- Seat stringer
- Material
- Pine
- Cross section
- 5.50 in × 0.75 in
- Orientation
- Flat
- Clear span
- 20.0 in
- Load applied
- 100 lb
- Measured sag
- 0.0385 in
- Working load
- ~250 lb
- Finished weight
- 28.3 lb
Load case ~100 lbs on this member - its share of a ~250 lb load on the whole piece
| Check | Result |
|---|---|
| Bending in the seat stringer — 55% of allowable | PASS |
| Sag in the same member — L/520 against an L/120 limit | PASS |
| Right Arm Rest | PASS |
| Front Seat Slat | PASS |
| Seat Slat 2 | PASS |
| Seat Slat 3 | PASS |
| Tip-over resistance, unloaded — ratio 0.66 against a 1.0 target | ADVISORY |
Conservative run Checked a second time against stricter standards, the same member reads L/346 at 83% of allowable — PASS
Install anti-tip hardware (wall anchor)
Alternative: Add 21 lbs ballast to base
Model coverage 48% of this design resolved to a load path down to the ground in our model (12/25 surfaces have load path to ground). Parts outside that path were checked for their own strength but not for what they carry.
The structural reality. We checked the part that works hardest here — the pine seat stringer — as a loaded beam over its real working span. Under a realistic in-use load it barely flexes — well within furniture limits, deflecting only about 1/520 of its span, with bending stress at roughly 55% of what the wood allows. In short, it should feel firm and stay that way.
Sound for normal use — just don’t overload it. Our conservative estimate puts the safe working load at ~250 lbs — enough for an adult sitting down with margin to spare. Real-world strength depends just as much on assembly: glue every joint, keep the frame square, and drive your fasteners fully home.
These are planning estimates, not a stamped engineering analysis. Wood varies board to board — for anything safety-critical, check with a qualified pro.
Furniture mode, analysis v7.0. Planning estimates — check anything safety-critical with a qualified pro. How we analyze plans.
Build tips
Before you build
- When assembling the back and seat, lay the parts out on a flat surface and use clamps to hold them in position before drilling. The 14 assembly steps are much easier if things aren't shifting.
- Use a prybar and hammer to dismantle the pallets, but work slowly to avoid cracking the boards. It's often easier to cut the boards away from the main runners if you can afford to lose a few inches of length.
Reference
Materials & cut list
Lumber & sheet goods
- 3-4 good quality shipping pallets
- 1x6x6′ Pine or Cedar (qty: 2)
- 1x4x8′ Pine or Cedar (qty: 6)
Hardware
- #8 x 1-1/4 in wood screws (qty: 100)
- Wood glue
- Wood putty
View Full Cut List & Materials
| Part Name | Qty | Dimensions | Material |
|---|---|---|---|
| Rear Legs/Seat Stringers | 2 | 35" x 5.5" x 0.75" | 1x6 Pallet Wood |
| Arm Rests | 2 | 32" x 5.5" x 0.75" | 1x6 Pallet Wood |
| Bottom Backrest Rail | 1 | 21.5" x 3.5" x 0.75" | 1x4 Pallet Wood |
| Top Backrest Rail | 1 | 22" x 3.5" x 0.75" | 1x4 Pallet Wood |
| Front Legs | 2 | 20" x 3.5" x 0.75" | 1x4 Pallet Wood |
| Front Crosspiece | 1 | 20" x 3.5" x 0.75" | 1x4 Pallet Wood |
| Front Seat Slat | 1 | 20" x 3.5" x 0.75" | 1x4 Pallet Wood |
| Rear Crosspiece | 1 | 18.5" x 3.5" x 0.75" | 1x4 Pallet Wood |
| Rear Back Supports | 2 | 26" x 3.5" x 0.75" | 1x4 Pallet Wood |
| Seat Slats | 9 | 20" x 1.75" x 0.75" | 1x4 Pallet Wood |
| Chair Back Slats | 7 | 36" x 3.5" x 0.75" | 1x4 Pallet Wood |
Cut List Calculator
Cut List Calculator
Calculating optimal cuts...
| Part | Qty | Length | Width | Material |
|---|
Original plan
About this design
This design is jkratman’s work, not ours. We review free DIY plans and add the engineering: load paths, spans, joints, and the fixes worth making before you cut. We do not republish the build instructions. For the steps, the photographs and the author’s own notes, go to the source.
Keep looking
Other plans to compare
Compare these plans side-by-side →
We have reviewed these builds too: