
Plan review · Seating
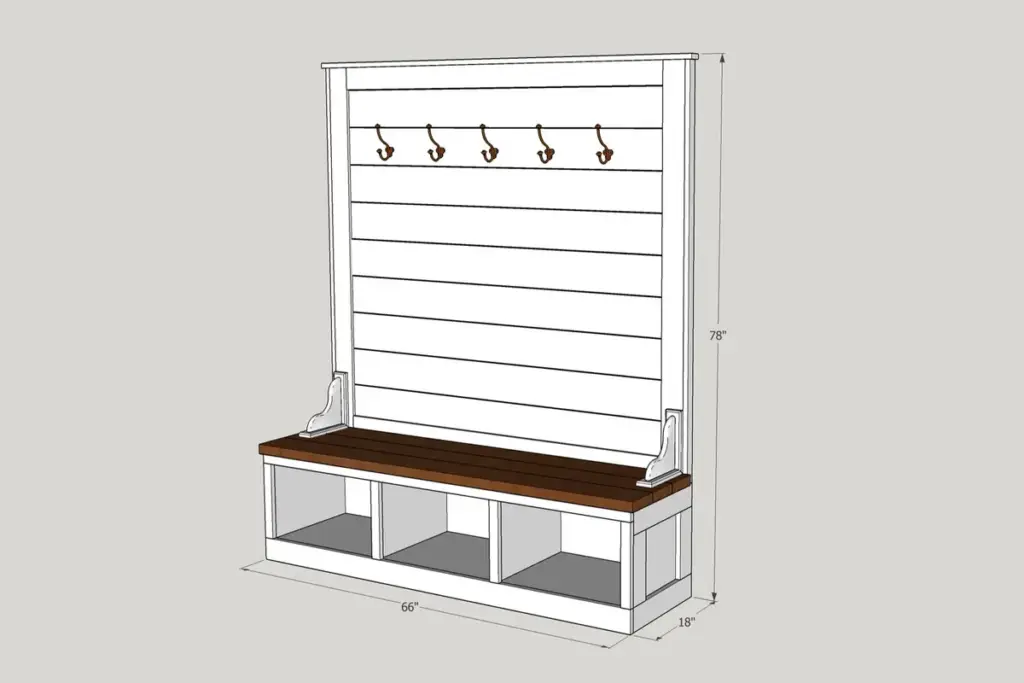
Shiplap Hall Tree Bench
A plan by Sadie Mae John · reviewed by ThePlanStack, January 2026
Handsome entry bench, but it's tall and tippy — anchor it to the wall before you load the hooks.
Sturdy for everyday use — holds ~250 lb with margin to spare — and it tips easily, so read the tip-over note below.
- Cost$150-$200
- SkillIntermediate
- TimeA weekend
- Holds~250 lb
The honest take
What the plan doesn't tell you
• This is a large, heavy project at over 6 ft tall and 5 ft wide. Assemble it near its final location or get help moving it.
• Attaching the upper hutch to the bench base is a critical alignment step. Use clamps and a helper to ensure it’s square and flush before driving the screws.
• The angled cuts on the top shelf supports need to be precise. Double-check your miter saw settings before cutting.
• Installing the shiplap requires consistent spacing. Use a spacer block, like a nickel or a carpenter’s pencil, to keep the gaps uniform.
• The final assembly can be top-heavy before it’s secured to a wall. Don’t leave it freestanding, especially if you have kids or pets.
This Shiplap Hall Tree plan is well-structured for an intermediate builder. The reliance on pocket screws and glue for the main structure provides good strength for a piece that will see daily use. Using pine or poplar is a smart, cost-effective choice for a painted finish. With 12 assembly steps and orientation notes for 11 of them, the plan doesn't leave much to guesswork, which is critical for a large project like this. It's a solid plan that will produce a sturdy hall tree if you follow it closely.
Who it's for
Who should build this — and who should skip it
A good step-up build — fine if you've made a few things and own a drill/driver and a way to cut straight. An entry bench/hall tree for sitting and hanging coats. Skip it if you need it to carry much past ~250 lb — and treat it as a piece to anchor to the wall, not a free-standing one.
The checks
What we checked, and what held
Holds ~250 lb safely
Finished size 75.5H x 65.25W x 18.25D
Comfortably handles normal household use with a sound safety margin.
- Governing member
- Bench seat panel
- Material
- Plywood
- Cross section
- 16.50 in × 0.75 in
- Orientation
- Flat
- Clear span
- 22.5 in
- Load applied
- 175 lb
- Measured sag
- 0.0298 in
- Working load
- ~250 lb
- Finished weight
- 73.3 lb
Load case ~175 lbs on this member - its share of a ~250 lb load on the whole piece
| Check | Result |
|---|---|
| Bending in the bench seat panel — 19% of allowable | PASS |
| Sag in the same member — L/754 against an L/120 limit | PASS |
| Right Side Trim | PASS |
| Top Trim | PASS |
| Base Trim | PASS |
| Top Shelf | PASS |
| Tip-over resistance, unloaded — ratio 0.89 against a 1.0 target | ADVISORY |
Conservative run Checked a second time against stricter standards, the same member reads L/503 at 29% of allowable — PASS
Install anti-tip hardware (wall anchor)
Alternative: Add 17 lbs ballast to base
The structural reality. We checked the part that works hardest here — the plywood bench seat panel — as a loaded beam over its real working span. Under a realistic in-use load it barely flexes — well within furniture limits, deflecting only about 1/754 of its span, with bending stress at roughly 19% of what the wood allows. In short, it should feel firm and stay that way.
Solid for its purpose. Our conservative estimate puts the safe working load at ~250 lbs — enough for seating, plus the occasional stand-on to reach a high shelf. Real-world strength depends just as much on assembly: glue every joint, keep the frame square, and drive your fasteners fully home.
One safety note: this is a tall, relatively narrow piece, so it can tip if pulled or climbed on. Anchor it to the wall with anti-tip hardware, especially in a home with children.
These are planning estimates, not a stamped engineering analysis. Wood varies board to board — for anything safety-critical, check with a qualified pro.
Furniture mode, analysis v7.0. Planning estimates — check anything safety-critical with a qualified pro. How we analyze plans.
Build tips
Before you build
- Paint the shiplap boards *before* you install them. It's far easier to get a clean finish on a flat board than inside the assembled hutch.
- When assembling the main carcase, use a large framing square and clamps to hold the sides to the bench top. Pocket screws can pull the joint slightly out of square if it's not held firmly during assembly.
- Dry fit the cubby dividers before using any glue or brad nails. This ensures all your cuts are accurate and saves you from a frustrating disassembly.
Reference
Materials & cut list
Lumber & sheet goods
- 2x4x8′ (qty: 2)
- 2x6x8′ (qty: 2)
- 1x4x8′ (qty: 2)
- 1x2x8′ (qty: 1)
- 1x3x8′ (qty: 1)
- 1x12x6′ (qty: 1)
- 1/4 in plywood sheet 4×8 (qty: 1)
- 3/4 in plywood sheet 4×8 (qty: 1)
- 1x6x8′ Tongue and Groove Boards (qty: 6)
Hardware
- 2-1/2 in pocket screws (qty: 100)
- 1-1/4 in pocket screws (qty: 100)
- 1-1/4 in brad nails
- Wood glue
- Coat Hooks (qty: 5)
View Full Cut List & Materials
| Part Name | Qty | Dimensions | Material |
|---|---|---|---|
| Bench Top | 1 | 45" x 16.5" x 0.75" | 3/4 Plywood |
| Bench Sides | 2 | 17.25" x 16.5" x 0.75" | 3/4 Plywood |
| Bench Bottom | 1 | 43.5" x 16.5" x 0.75" | 3/4 Plywood |
| Bench Divider | 2 | 12.5" x 16.5" x 0.75" | 3/4 Plywood |
| Bench Back | 1 | 44.75" x 13.25" x 0.25" | 1/4 Plywood |
| Top Shelf | 1 | 45" x 10" x 0.75" | 3/4 Plywood |
| Top Shelf Sides | 2 | 10" x 10" x 0.75" | 3/4 Plywood |
| Top Shelf Back | 1 | 44.75" x 10" x 0.25" | 1/4 Plywood |
| Shiplap | 8 | 43.5" x 5.5" x 0.75" | 1x6 |
| Side Trim | 2 | 70" x 1.5" x 0.75" | 1x2 |
| Top Trim | 1 | 45" x 1.5" x 0.75" | 1x2 |
| Base Trim | 1 | 45" x 3.5" x 0.75" | 1x4 |
| Side Base Trim | 2 | 17.25" x 3.5" x 0.75" | 1x4 |
Cut List Calculator
Cut List Calculator
Calculating optimal cuts...
| Part | Qty | Length | Width | Material |
|---|
Original plan
About this design
This design is Sadie Mae John’s work, not ours. We review free DIY plans and add the engineering: load paths, spans, joints, and the fixes worth making before you cut. We do not republish the build instructions. For the steps, the photographs and the author’s own notes, go to the source.
Keep looking
Other plans to compare
We have reviewed these builds too: