
Plan review · Tables
Modern Square Coffee Table
A plan by Shanty2Chic · reviewed by ThePlanStack, July 2026
The frame is over-built and the top barely notices an adult standing on it — but the plan sets a 36 inch top on a 20 inch base, and 50 lbs on the overhanging edge is enough to start lifting the far side.
Solid for normal use — holds ~200 lb; just don't overload it — and it tips easily, so read the tip-over note below.
- Cost$110-$180
- SkillBeginner
- TimeA weekend
- Holds~200 lb
The honest take
What the plan doesn't tell you
• This table tips more easily than it looks like it should. A 36 in top on a 20 in base means eight inches of the top hangs past the frame on every side, and at about 39 lbs there is not much weight holding the far side down. Fifty pounds on the edge — a person perching, a child leaning, a foot up — is right at the balance point. Add ballast inside the base or build the base wider; both fixes are in the notes above.
• The pole wrap makes this worse, not better. It is glued and pinned to the outside of the base and carries nothing structurally, but it turns a skinny frame into what reads as a solid plinth. A table that looks like it has a big base is a table people sit on. Know that it does not.
• If you use an edge-glued panel rather than plywood for the top, do not screw it down solid at every point. A 36 in wide solid panel moves across its width with the seasons; pinned rigidly to the frame at both ends it will crack or cup. Fix the middle and let the outside slide.
• Every joint in the base is a 2×4 butt joint held by pocket screws. The plan lists wood glue — use it on every mating face, not just the ones you remember. The joints are only working at 7% of capacity, so this is not about strength; it is about the frame staying square once the screws have been through a few seasons of the table being dragged across a rug.
• Check the base is genuinely centred before you drive the 2 in screws. Eight inches on all four sides is what the tipping arithmetic above assumes, and the margin is already thin. Set the base 3 in off and one side overhangs 11 in instead of 8 while the weight holding it down moves the wrong way — enough to turn a borderline check into a clear fail on that edge.
Three 2x4s, a square of plywood and a roll of pole wrap, all of it pocket-screwed — this really is a beginner build, and the structure is not where it will bite you. The frame is working at single-digit percentages everywhere we looked and the top does not care about an adult standing on it. What the plan gets wrong is proportion. Setting the base eight inches in from each side is what gives the table its floating look, and it is also what makes it tippy: fifty pounds on the rim and the opposite side starts to come up. The pole wrap then hides how narrow that base really is. Widen the base or weight it — either takes ten minutes to plan and neither changes the build — and this is a genuinely good-looking first project.
Who it's for
Who should build this — and who should skip it
A first pocket-hole project. Twelve identical-ish 2x4 cuts, one panel, and no joinery to learn beyond driving a Kreg screw straight — a miter saw and a jig will get you through the base in an evening. It suits a big living room, which is the point: 36 inches square reads as deliberate next to a large sofa and silly next to a small one. Think twice if you have toddlers, or if this is going to be the thing people put their feet on, unless you widen or weight the base first.
The checks
What we checked, and what held
Holds ~200 lb safely
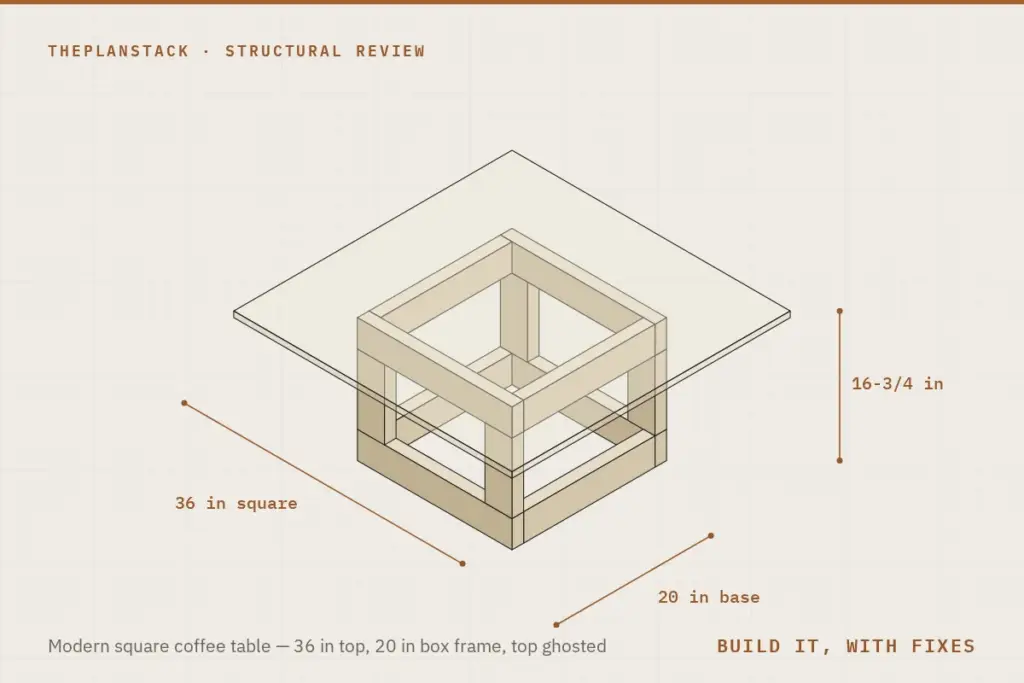
Finished size 16.75H x 36W x 36D
The top and the frame are a long way inside their limits. The rating is held down entirely by the footprint - a 36 in top on a 20 in base.
- Governing member
- Tabletop, between the top rails of the base
- Material
- 3/4 in plywood or edge-glued panel
- Cross section
- 36 in × 36 in × 0.75 in
- Orientation
- Flat, bearing on all four top rails
- Clear span
- 17.0 in
- Load applied
- 200 lb
- Measured sag
- 0.0116 in
- Working load
- ~200 lb
- Finished weight
- 39.3 lb
Load case an adult standing or kneeling on the middle of the top - the case that governs. It is not a load you can put anywhere: the same weight on the overhanging edge tips the table
| Check | Result |
|---|---|
| Bending in the tabletop, between the top rails of the base — 32% of allowable | PASS |
| Sag in the same member — L/1471 against an L/240 limit | PASS |
| Corner posts in compression (0.5%) | PASS |
| Base rails in shear (1.7%) | PASS |
| Pocket-screwed joints (7% worst of 28) | PASS |
| Racking, side to side (safety factor 20) | PASS |
| Tip-over resistance, 50 lb pressing down on the middle of one edge — ratio 0.98 against a 1.0 target | ADVISORY |
The ratio above is for 50 lb pressing straight down on the middle of one edge - someone perching on the table, or a foot on it. At that load the far side is on the point of lifting. Do not let children sit or stand on it.
Cheapest fix, and it keeps the design exactly: about 21 lb of ballast hidden inside the base - a paving slab or two, cut to sit between the bottom rails - takes that ratio to 1.50.
Better fix: cut the base bigger. Take the four 20 in pieces to 28 in and the four 17 in pieces to 25 in. The overhang drops to 4 in, the ratio goes to 2.75, and it costs one more 2x4.
The structural reality. Nothing about this table is close to breaking. The top is a 36 in square of 3/4 in panel carried on a box frame, and because the frame is only 20 in across, the top never spans more than 17 in between the rails it sits on. Stand an adult on the middle of it — 200 lbs — and it works the panel to 32% of its allowable bending stress and sags 0.012 in, about one part in 1471 of the span. That figure credits the panel’s full 36 in width, which a single point load does not really engage — double it to be safe and the top is still comfortable. Underneath, the frame is barely awake: the four 9 in corner posts run at 0.5% in compression, the eight 2×4 rails at 1.7% in shear, and the hardest-working of the 28 pocket-screwed joints sits at 7%. Side-to-side racking comes out at a safety factor of 20. As a piece of framing this is enormously over-built for a coffee table, and that is the plan working as intended — the base is sized to look chunky, not to be strong.
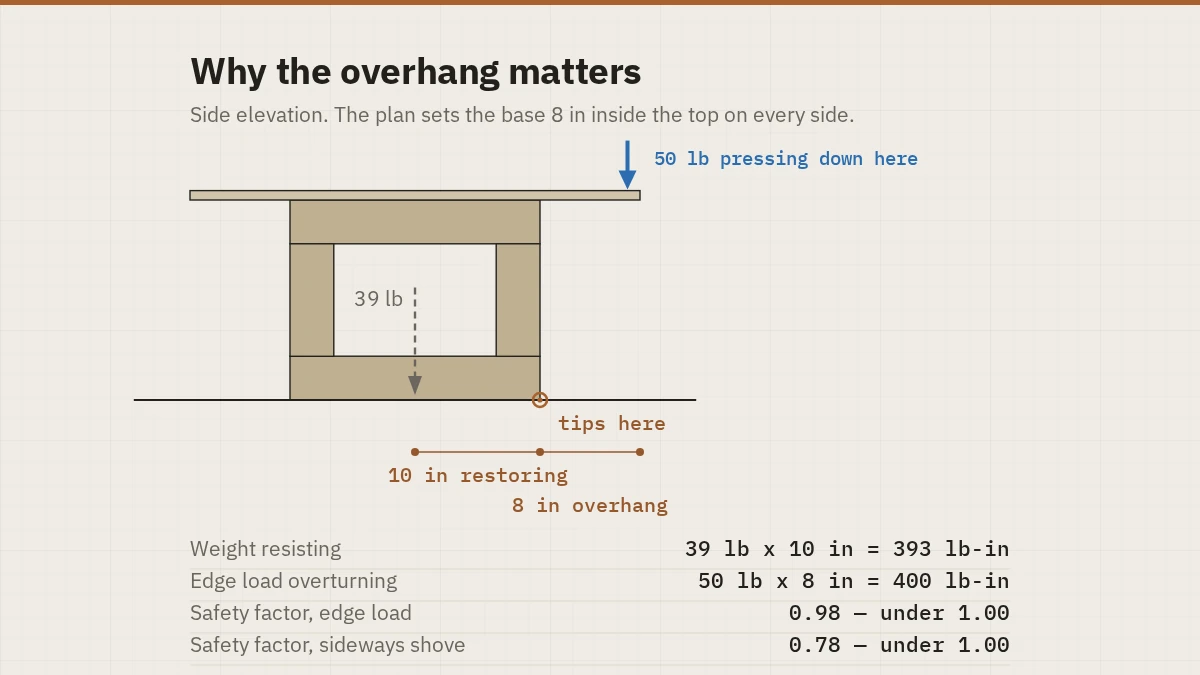
Why this is a review and not a green light. The problem is not strength, it is the footprint, and the plan puts it there on purpose. Step 6 says to centre the base “about 8 in in from each side”, which leaves a 36 in top standing on a 20 in base. The table weighs about 39 lbs, so the weight holding it down acts 10 in from the tipping edge while anything you put on the rim acts 8 in the other way. Work that through and 50 lbs pressing down on the middle of one edge gives a safety factor of 0.98 — the far side is on the point of coming up. That is not an exotic load case. It is someone perching on the table to reach across it, a child leaning on the corner, or a foot planted on the edge. A 30 lb sideways shove at the top comes out at 0.78 on the same arithmetic, though a table this light will usually slide before it tips. Neither of these is a structural failure and neither forces the rating down on its own, which is why the verdict is a light-use one rather than a fail.
What we would change. Two options, and they are both cheap. If you want the floating look exactly as drawn, hide about 21 lbs of ballast inside the base — a paver cut to drop between the bottom rails, screwed down so it cannot slide — and the edge case goes to 1.50. If you would rather fix the geometry, cut the four 20 in pieces to 28 in and the four 17 in pieces to 25 in instead. That makes the base 28 in square, cuts the overhang to 4 in, takes the edge case to 2.75, and costs you one extra 2×4. The top, the joinery and the build steps are all unchanged.
The one the model cannot see. The plan offers a choice for the top: 3/4 in plywood, or an edge-glued panel. Those two behave completely differently once the table is built. Plywood is stable and you can screw it down hard anywhere you like. A 36 in wide solid-wood panel is not — across that width it will move something like a quarter of an inch between a damp summer and a dry heated winter, and Step 6 has you screwing it to a rigid frame at both ends of four rails. Something has to give, and it will be the panel. If you buy the edge-glued panel, fix it at the centre and let the outer screws move: slot those pocket holes sideways, or swap them for figure-8 fasteners or Z-clips. Our analysis ran the top as softwood, which is what an edge-glued panel is; plywood differs in the detail but not by enough to matter here, because the top is nowhere near its limit either way.
These are planning estimates, not a stamped engineering analysis. Wood varies board to board, and assembly quality matters as much as the arithmetic — for anything safety-critical, check with a qualified pro.
Furniture mode, analysis v7.0. Planning estimates — check anything safety-critical with a qualified pro. How we analyze plans.
Build tips
Before you build
- Cut the four 9 in posts against a stop block, in one session. They set the height of both side frames — if they differ by even a sixteenth the top will rock, and the pole wrap will hide the reason from you forever.
- Build the two side frames on the same flat surface and check both diagonals before the glue grabs. Nothing else in this design squares the base, and the four 17 in cross rails will happily lock in a parallelogram.
- Dry-fit the base under the top and mark all four sides before you drive the 2 in pocket screws from inside. Eight inches on each side is what makes it look deliberate, and it is what the stability numbers assume.
- Stain or seal the top and the frame before the pole wrap goes on. Once the wrap is glued to the outside of the base you will not get finish into the seams, and the wrap itself takes finish differently from flat stock.
Reference
Materials & cut list
Lumber & sheet goods
- 2x4x8′ SPF (qty: 3) — for the twelve base pieces
- 3/4 in plywood or edge-glued panel, 36 in x 36 in (qty: 1)
- 1×2 board for the top trim, mitred at 45 degrees (qty: 4 pieces at 37-1/2 in)
- Pole wrap, enough for four sides of a 20 in x 16 in base
Hardware
- 1-1/4 in pocket-hole screws
- 2 in pocket-hole screws
- Wood glue
- Pin nails or brad nails, for the wrap and the trim
- Figure-8 fasteners or Z-clips — not in the plan’s list; use them if your top is a solid edge-glued panel
- Sandpaper, stain and top coat of choice
View Full Cut List & Materials
| Part Name | Qty | Dimensions | Material |
|---|---|---|---|
| Side-frame rails | 4 | 20" x 3.5" x 1.5" | 2x4 SPF |
| Cross rails | 4 | 17" x 3.5" x 1.5" | 2x4 SPF |
| Corner posts | 4 | 9" x 3.5" x 1.5" | 2x4 SPF |
| Tabletop | 1 | 36" x 36" x 0.75" | 3/4 in plywood or edge-glued panel |
| Top trim, mitred at 45 degrees | 4 | 37.5" x 1.5" x 0.75" | 1x2 |
Cut List Calculator
Cut List Calculator
Calculating optimal cuts...
| Part | Qty | Length | Width | Material |
|---|
Original plan
About this design
This design is Shanty2Chic’s work, not ours. We review free DIY plans and add the engineering: load paths, spans, joints, and the fixes worth making before you cut. We do not republish the build instructions. For the steps, the photographs and the author’s own notes, go to the source.
Keep looking
Other plans to compare
We have reviewed these builds too: