
Plan review · Outdoor
DIY Modern Outdoor Sofa
A plan by Kourtni from House on Longwood Lane · reviewed by ThePlanStack, January 2026
Seats two (~250 lb), but it's tippy — anchor it, and don't treat the back as a perch.
Solid for normal use — holds ~250 lb; just don't overload it — and it tips easily, so read the tip-over note below.
- Cost$100-$150
- SkillBeginner
- TimeA weekend
- Holds~250 lb
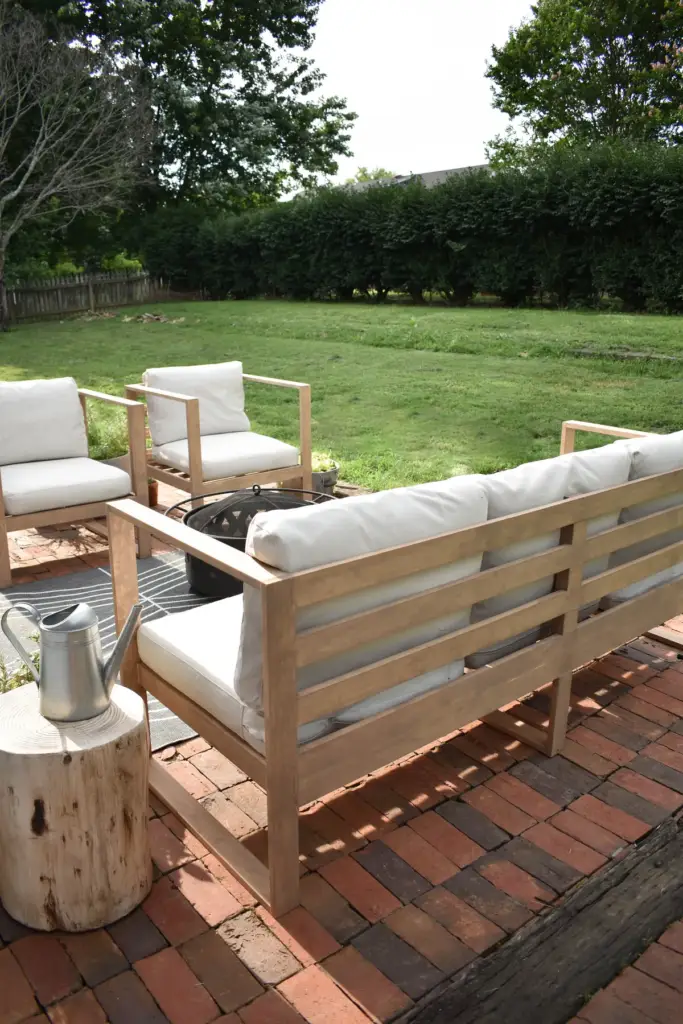
The honest take
What the plan doesn't tell you
• At 77 inches wide, the main frame can easily be assembled out of square. Constantly check that it’s square by measuring corner-to-corner diagonals before driving the final screws.
• Pay very close attention to the diagrams when drilling pocket holes for the mirrored left and right side assemblies. It’s a common mistake to end up with two identical sides.
• The final assembled sofa will be heavy and awkward. Build it close to its final location or have a helper ready to move it to avoid damaging the joints or injuring yourself.
• With 44 total pieces, batch your cuts for identical parts to ensure consistency. A small error on your miter saw setup can create significant gaps later on.
This is a solid, straightforward plan for an outdoor sofa. Cedar is the right material choice for rot resistance. The design relies entirely on pocket screws, which is fine for speed, but you must use exterior-rated glue and screws to prevent joints from loosening with seasonal wood movement. The plan's detailed orientation guidance in 8 of the 9 steps is a huge help and will prevent common assembly errors. It's a good build for someone who knows their way around a Kreg Jig.
Who it's for
Who should build this — and who should skip it
First-timer friendly — a solid early project with no fussy joinery. Patio/deck seating roomy enough for two. Skip it if you need it to carry much past ~250 lb — and treat it as a piece to anchor to the wall, not a free-standing one.
The checks
What we checked, and what held
Holds ~250 lb safely
Finished size 30H x 77W x 28D
Suitable for light household use; avoid concentrated overloading.
- Governing member
- Seat frame rail (between supports)
- Material
- Pine
- Cross section
- 2.50 in × 0.75 in
- Orientation
- On edge
- Clear span
- 30.0 in
- Load applied
- 100 lb
- Measured sag
- 0.0257 in
- Working load
- ~250 lb
- Finished weight
- 33.9 lb
Load case ~100 lbs on this member - its share of a ~250 lb load on the whole piece
| Check | Result |
|---|---|
| Bending in the seat frame rail (between supports) — 55% of allowable | PASS |
| Sag in the same member — L/1167 against an L/120 limit | PASS |
| Back Seat Frame | PASS |
| Front Slat Support | PASS |
| Back Slat Support | PASS |
| Seat Slat 1 | PASS |
| Tip-over resistance, unloaded — ratio 0.63 against a 1.0 target | ADVISORY |
Conservative run Checked a second time against stricter standards, the same member reads L/778 at 82% of allowable — PASS
Install anti-tip hardware (wall anchor)
Alternative: Add 25 lbs ballast to base
The structural reality. We checked the part that works hardest here — the pine seat frame rail — as a loaded beam over its real working span. Under a realistic in-use load it barely flexes — well within furniture limits, deflecting only about 1/1167 of its span, with bending stress at roughly 55% of what the wood allows. In short, it should feel firm and stay that way.
Sound for normal use — just don’t overload it. Our conservative estimate puts the safe working load at ~250 lbs — enough for an adult sitting down with margin to spare. Real-world strength depends just as much on assembly: glue every joint, keep the frame square, and drive your fasteners fully home.
These are planning estimates, not a stamped engineering analysis. Wood varies board to board — for anything safety-critical, check with a qualified pro.
Furniture mode, analysis v7.0. Planning estimates — check anything safety-critical with a qualified pro. How we analyze plans.
Build tips
Before you build
- Use an exterior-grade wood glue like Titebond III and coated, weather-resistant pocket hole screws. This is non-negotiable for outdoor furniture durability.
- When attaching the long seat supports and back rails, use clamps and a temporary support block in the middle. This prevents sagging during assembly and ensures the frame is level.
Reference
Materials & cut list
Lumber & sheet goods
- 1x2x8′ Select Pine (qty: 6)
- 1x3x8′ Select Pine (qty: 4)
- 1x3x6′ Select Pine (qty: 6)
- 2x2x8′ Pine (qty: 2)
Hardware
- 1-1/4 in Kreg pocket screws (qty: 52)
- 2 in wood screws (qty: 20)
- 3/4 in brad nails (qty: 56)
- Wood glue
- Sandpaper (180 and 220 grit)
- Varathane Stain (Flagstone)
- Varathane Polyurethane (Satin)
View Full Cut List & Materials
| Part Name | Qty | Dimensions | Material |
|---|---|---|---|
| Arm Uprights | 4 | 30" x 2.5" x 0.75" | 1x3 Pine |
| Arm Base Cross Pieces | 4 | 26.5" x 2.5" x 0.75" | 1x3 Pine |
| Arm Base Seat Mounts | 2 | 26.5" x 2.5" x 0.75" | 1x3 Pine |
| Seat Frame (Front/Back) | 2 | 72" x 2.5" x 0.75" | 1x3 Pine |
| Slat Supports | 2 | 72" x 1.5" x 1.5" | 2x2 Pine |
| Middle Brace (Vertical) | 2 | 10" x 2.5" x 0.75" | 1x3 Pine |
| Middle Brace (Horizontal) | 1 | 26.5" x 2.5" x 0.75" | 1x3 Pine |
| Seat Slats | 20 | 25" x 1.5" x 0.75" | 1x2 Pine |
| Back Slats | 4 | 72" x 2.5" x 0.75" | 1x3 Pine |
| Back Slat Brace (Vertical) | 1 | 17.6875" x 2.5" x 0.75" | 1x3 Pine |
| Back Slat Brace (Spacers) | 2 | 2.5" x 2.5" x 0.75" | 1x3 Pine |
Cut List Calculator
Cut List Calculator
Calculating optimal cuts...
| Part | Qty | Length | Width | Material |
|---|
Original plan
About this design
This design is Kourtni from House on Longwood Lane’s work, not ours. We review free DIY plans and add the engineering: load paths, spans, joints, and the fixes worth making before you cut. We do not republish the build instructions. For the steps, the photographs and the author’s own notes, go to the source.
Keep looking
Other plans to compare
We have reviewed these builds too: